13 December 2012

Day 283: A daunting task

If you are uncomfortable with heights, don’t take a job as a stone mason…


The builder’s holidays are coming up and everyone will be off site until next year. Enjoy Christmas and  I’ll see you soon!

30 November 2012

Day 270: Stone walls going up

The walls surrounding the service areas (scullery, kitchen, store room and garden store) are built with stone. The stone work is a time consuming and labour intensive process…but the effort is worth the reward.


20 November 2012

Day 260: Details

The cavity walls consist of 110mm brick, 110mm air, 110mm brick and an additional 110mm stone on the outer façade. Butterfly wall ties are built into the wall to secure the two brick sleeves. A plastic layer, damp proof course (DPC), is installed above the floor level to prevent damp to gather in the cavity. Weep holes are located above the DPC to allow the moisture to escape.

This is the opening for our dog door. The dog house will be built into the store room with a door to the outside and a door to the inside.

It is difficult to report on the overall progress. The ground floor walls are almost up, but there is a lot that needs to be done before the next slab can be cast. Steel columns need to be installed to help carry the weight of the first floor slab. Two small slabs above the store rooms and scullery need to be cast. The braai and fireplace must be built in. Let’s just say that it is not going to happen this year.

01 November 2012

Day 241: Progress report

To give you an overview, here is where we are now:

 • The driveway is complete
 • The basement is structurally complete
 • The basement still needs plasterwork, pipes, electrical wires, rainwater collection system, stairs, front
   door, steel sliding gate, concrete polishing
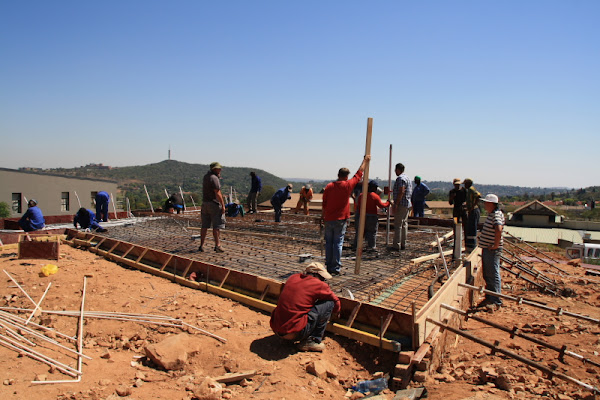
 • The ground floor slab is structurally complete
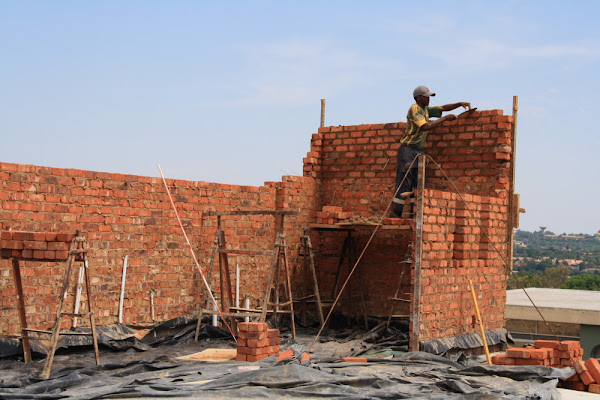
 • The ground floor walls are starting to go up
 • The ground floor still needs walls, stone, braai, fireplace, internal doors, windows, aluminium doors,
    structural steel columns, concrete polishing and kitchen fit out
 • Then the whole first floor and the roof still need to be built.

It is a slow process…


25 October 2012

Day 234: Incorrect slope


Imagine my surprise when we arrived on site on Saturday and found water dammed up on our southern patio. Friday night’s rain revealed the incorrect slope of the exterior slab. 


19 October 2012

Day 228: Concrete details


The shutter boards were removed, exposing all the details designed into the concrete slab.


Drip joint at the edge of the slab 


Aluminium channel to receive a LED light strip


Concrete column to brick wall connection


The light at the end of the tunnel is where the wine cellar is... 

18 October 2012

Day 227: Paved driveway

The concrete slabs in between the pavement prevents the paving stones from gradually sliding down the hill.


Steel box for water meter

17 October 2012

Day 226: Concrete grinding and polishing


This is the first step in the process of obtaining a polished concrete floor finish. A few millimeters are grinded off to expose the aggregate. At a later stage another layer will be grinded off until the final finished floor level is reached.  The concrete is then polished several times and sealed with a deep penetrating sealer.  


16 October 2012

Day 225: Stone masonry

 Eastern boundary wall

Tension between natural rock and stone wall in basement

10 October 2012

Day 219: Curing concrete

After casting, the concrete was covered with a plastic sheet to assist the curing process. We removed the sheet on Monday to have a look at our slab.


03 October 2012

Day 212: Casting of ground floor slab

On photographs everything looks so calm and in control. In reality however…the site was in total chaos. The concrete was supposed to arrive at 8am. Instead, we were all running around until 12pm installing drainage, tying down steel mesh, fixing shutter boards and getting serious sunburn.


Finally when everything was in place the concrete pouring could start. They poured the balconies first. The concrete mixture contained a waterproofing admixture mixed into the concrete prior to delivery. 


As they pour, someone directs the flow, someone else vibrates the concrete, another person starts levelling and before you know it you have a ground floor slab complete with electrical conduits and plumbing pipes. 

01 October 2012

Day 210: The night before casting


The site was covered with people this afternoon, scurrying to ready everything for tomorrow’s casting of the slab. Yet, it is not quite right… 


12 September 2012

Day 191: Wine Cellar – The true story

On the day that the shutter work was removed from the concrete wine cellar, I received a phone call from my builder. “Nadine, I think you should come to site”, he said. I immediately expected the worst.  

When I arrived at site it did not look that bad. During the casting process the shutter work was not supported enough and the weight of the concrete pushed the shutter work a little bit further apart. This caused the plastic pipes to shift. As a result, some of the pipes were skew and irregular at the visible façade.


The first attempt showing the irregularities as well as concrete honeycomb at the bottom left corner.


 My builder made the decision to break down and rebuild. The shutter work was thoroughly supported the second time and the concrete systematically compacted to prevent the formation of concrete honeycomb.


The final result showing smooth concrete and even spaced openings. Almost perfect! Now we just need to fill it up with wine…

P.S. Can anyone tell me why the flaking occurred at the top?

26 August 2012

Day 174: Wine cellar

We had this idea of building a wine cellar under the stairs. I designed a simple concrete wall with cylindrical holes cut in to house each bottle.  However, what seems simple in theory is rarely ever simple in construction. After exploring the various methods to make holes in concrete my builder constructed a sample wall using plastic pipes as place holders. The pipes needed to be well oiled using the correct releasing agent, or otherwise they broke the edges of the concrete when taken out.


The sample wall showing the required end result.


Drilling holes in the shutter work to ensure the correct position of each cylindrical opening.


Shutter work in position to receive concrete infill.

Now, we need to wait and see. I will post an update as soon as the shutter boards are removed. I hope you are as curious as I am…